Biopython version 1.86
© 2025. All rights reserved.
© 2025. All rights reserved.
Mocapy++ is a machine learning toolkit for training and using Bayesian networks. It has been used to develop probabilistic models of biomolecular structures. The goal of this project is to develop a Python interface to Mocapy++ and integrate it with Biopython. This will allow the training of a probabilistic model using data extracted from a database. The integration of Mocapy++ with Biopython will provide a strong support for the field of protein structure prediction, design and simulation.
Discovering the structure of biomolecules is one of the biggest problems in biology. Given an amino acid or base sequence, what is the three dimensional structure? One approach to biomolecular structure prediction is the construction of probabilistic models. A Bayesian network is a probabilistic model composed of a set of variables and their joint probability distribution, represented as a directed acyclic graph. A dynamic Bayesian network is a Bayesian network that represents sequences of variables. These sequences can be time-series or sequences of symbols, such as protein sequences. Directional statistics is concerned mainly with observations which are unit vectors in the plane or in three-dimensional space. The sample space is typically a circle or a sphere. There must be special directional methods which take into account the structure of the sample spaces. The union of graphical models and directional statistics allows the development of probabilistic models of biomolecular structures. Through the use of dynamic Bayesian networks with directional output it becomes possible to construct a joint probability distribution over sequence and structure. Biomolecular structures can be represented in a geometrically natural, continuous space. Mocapy++ is an open source toolkit for inference and learning using dynamic Bayesian networks that provides support for directional statistics. Mocapy++ is excellent for constructing probabilistic models of biomolecular structures; it has been used to develop models of protein and RNA structure in atomic detail. Mocapy++ is used in several high-impact publications, and will form the core of the molecular modeling package Phaistos, which will be released soon. The goal of this project is to develop a highly useful Python interface to Mocapy++, and to integrate that interface with the Biopython project. Through the Bio.PDB module, Biopython provides excellent functionality for data mining biomolecular structure databases. Integrating Mocapy++ and Biopython will allow training a probabilistic model using data extracted from a database. Integrating Mocapy++ with Biopython will create a powerful toolkit for researchers to quickly implement and test new ideas, try a variety of approaches and refine their methods. It will provide strong support for the field of biomolecular structure prediction, design, and simulation.
Michele Silva (michele.silva@gmail.com)
Mentors
Thomas Hamelryck
Eric Talevich
’'’Gain understanding of SEM and directional statistics ‘’’
’'’Study Mocapy++’s use cases ‘’’
’'’Work with Mocapy++ ‘’’
’'’Design Mocapy++’s Python interface ‘’’
’'’Implement Python bindings ‘’’
’'’Explore Mocapy++’s applications ‘’’
Hosted at the gSoC11 Mocapy branch
There is already an effort to provide bindings for Mocapy++ using Swig. However, Swig is not the best option if performance is to be required. The Sage project aims at providing an open source alternative to Mathematica or Maple. Cython was developed in conjunction with Sage (it is an independent project, though), thus it is based on Sage’s requirements. They tried Swig, but declined it for performance issues. According to the Sage programming guide “The idea was to write code in C++ for SAGE that needed to be fast, then wrap it in SWIG. This ground to a halt, because the result was not sufficiently fast. First, there is overhead when writing code in C++ in the first place. Second, SWIG generates several layers of code between Python and the code that does the actual work”. This was written back in 2004, but it seems things didn’t evolve much. The only reason I would consider Swig is for future including Mocapy++ bindings on BioJava and BioRuby projects.
Boost Python is comprehensive and well accepted by the Python community. I would go for it for its extensive use and testing. I would decline it for being hard to debug and having a complicated building system. I don’t think it would be worth including a boost dependency just for the sake of creating the Python bindings, but since Mocapy++ already depends on Boost, using it becomes a more attractive option. In my personal experience, Boost Python is very mature and there are no limitations on what one can do with it. When it comes to performance, Cython still overcomes it. Have a look at the Cython C++ wrapping benchmarks and check the timings of Cython against Boost Python. There are also previous benchmarks comparing Swig and Boost Python.
It is incredibly faster than other options to create python bindings to C++ code, according to several benchmarks available on the web. Check the Simple benchmark between Cython and Boost.Python. It is also very clean and simple, yet powerful. Python’s doc on porting extension modules mentions cython: “If you are writing a new extension module, you might consider Cython.” Cython has now support for efficient interaction with numpy arrays. it is a young, but developing language and I would definitely give it a try for its leanness and speed.
Since Boost is well supported and Mocapy++ already relies on it, we decided to use Boost.Python for the bindings.
For further information see Mocapy++Biopython - Box of ideas.
The source code for the prototype is on the gSoC11 branch: http://mocapy.svn.sourceforge.net/viewvc/mocapy/branches/gSoC11/bindings_prototype/
Bindings for a few Mocapy++ features and a couple of examples to find possible implementation and performance issues.
Procedure
Mocapy++’s interface remained unchanged, so the tests look similar to the ones in Mocapy/examples.
In the prototype the bindings were all implemented in a single module. For the actual implementation, we could mirror the src packages structure, having separated bindings for each package such as discrete, inference, etc.
It was possible to implement all the functionality required to run the examples. It was not possible to use the vector_indexing_suite when creating bindings for vectors of MDArrays. A few operators (in the MDArray) must be implemented in order to export indexable C++ containers to Python.
Two Mocapy++ examples that use discrete nodes were implemented in Python. There was no problem in exposing Mocapy’s data structures and algorithms. The performance of the Python version is very close to the original Mocapy++.
For additional details have a look at the Mocapy++ Bindings Prototype report.
’’’ Data structures ‘’’
Mocapy uses an internal data structure to represent arrays: MDArray. In order to make it easier for the user to interact with Mocapy’s API, it was decided to provide an interface that accepts numpy arrays. Therefore, it was necessary to implement a translation between a numpy array and an MDArray.
The translation from MDArray to python was done through the use of Boost.Python to_python_converter. We’ve implemented a template method convert_MDArray_to_numpy_array, which converts an MDArray of any basic type to a corresponding numpy array. In order to perform the translation the original array’s shape and internal data are copied into a new numpy array.
The numpy array was created using the Numpy Array API. The creation of a new PyArrayObject using existing data (PyArray_SimpleNewFromData) doesn’t copy the array data, it just stores a pointer to it. Thus, one can only free the data when there is no reference to the object. This was done through the use of a Capsule. Besides encapsulating the data, the capsule also stores a destructor to be used when the array is destroyed. The PyArrayObject has a field named “base” which points to the capsule.
The translation from Python to C++, i.e. creating an MDArray from a numpy array is slightly more complex. Boost.Python will provide a chunk of memory into which the new C++ object must constructed in-place. See the How to write boost.python converters article for more details.
A translation between std::vector of basic types (double, int…) and Python list was also implemented. For std::vector of custom types, such as Node, the translation to a Python list was not performed. If done the same ways as for basic types, a type error is raised: “TypeError: No to_python (by-value) converter found for C++ type”. When using vector_indexing_suite this problem was already solved. See Wrapping std::vector<AbstractClass*>. The only inconvenience of using the vector_indexing_suite is creating new types such as vector_Node, instead of using a standard Python list.
The code for the translations is in the mocapy_data_structures module.
’’’ Core functions ‘’’
The mocapy Python packages follow Mocapy’s current source tree. For each package, a shared library with the bindings was created. This makes compilation faster and debug easier. Also, if a single library was created it wouldn’t be possible to define packages.
Each of the libraries is called libmocapy_
The bindings code can be found in the Bindings directory.
Currently, tests to the just created interface are being developed. There are a few tests already implemented under the framework package: mocapy/framework/tests
’’’ Data structures ‘’’
While implementing the bindings for the remaining Mocapy++ functionality there were problems with methods that take pointers and references to an mdarray:
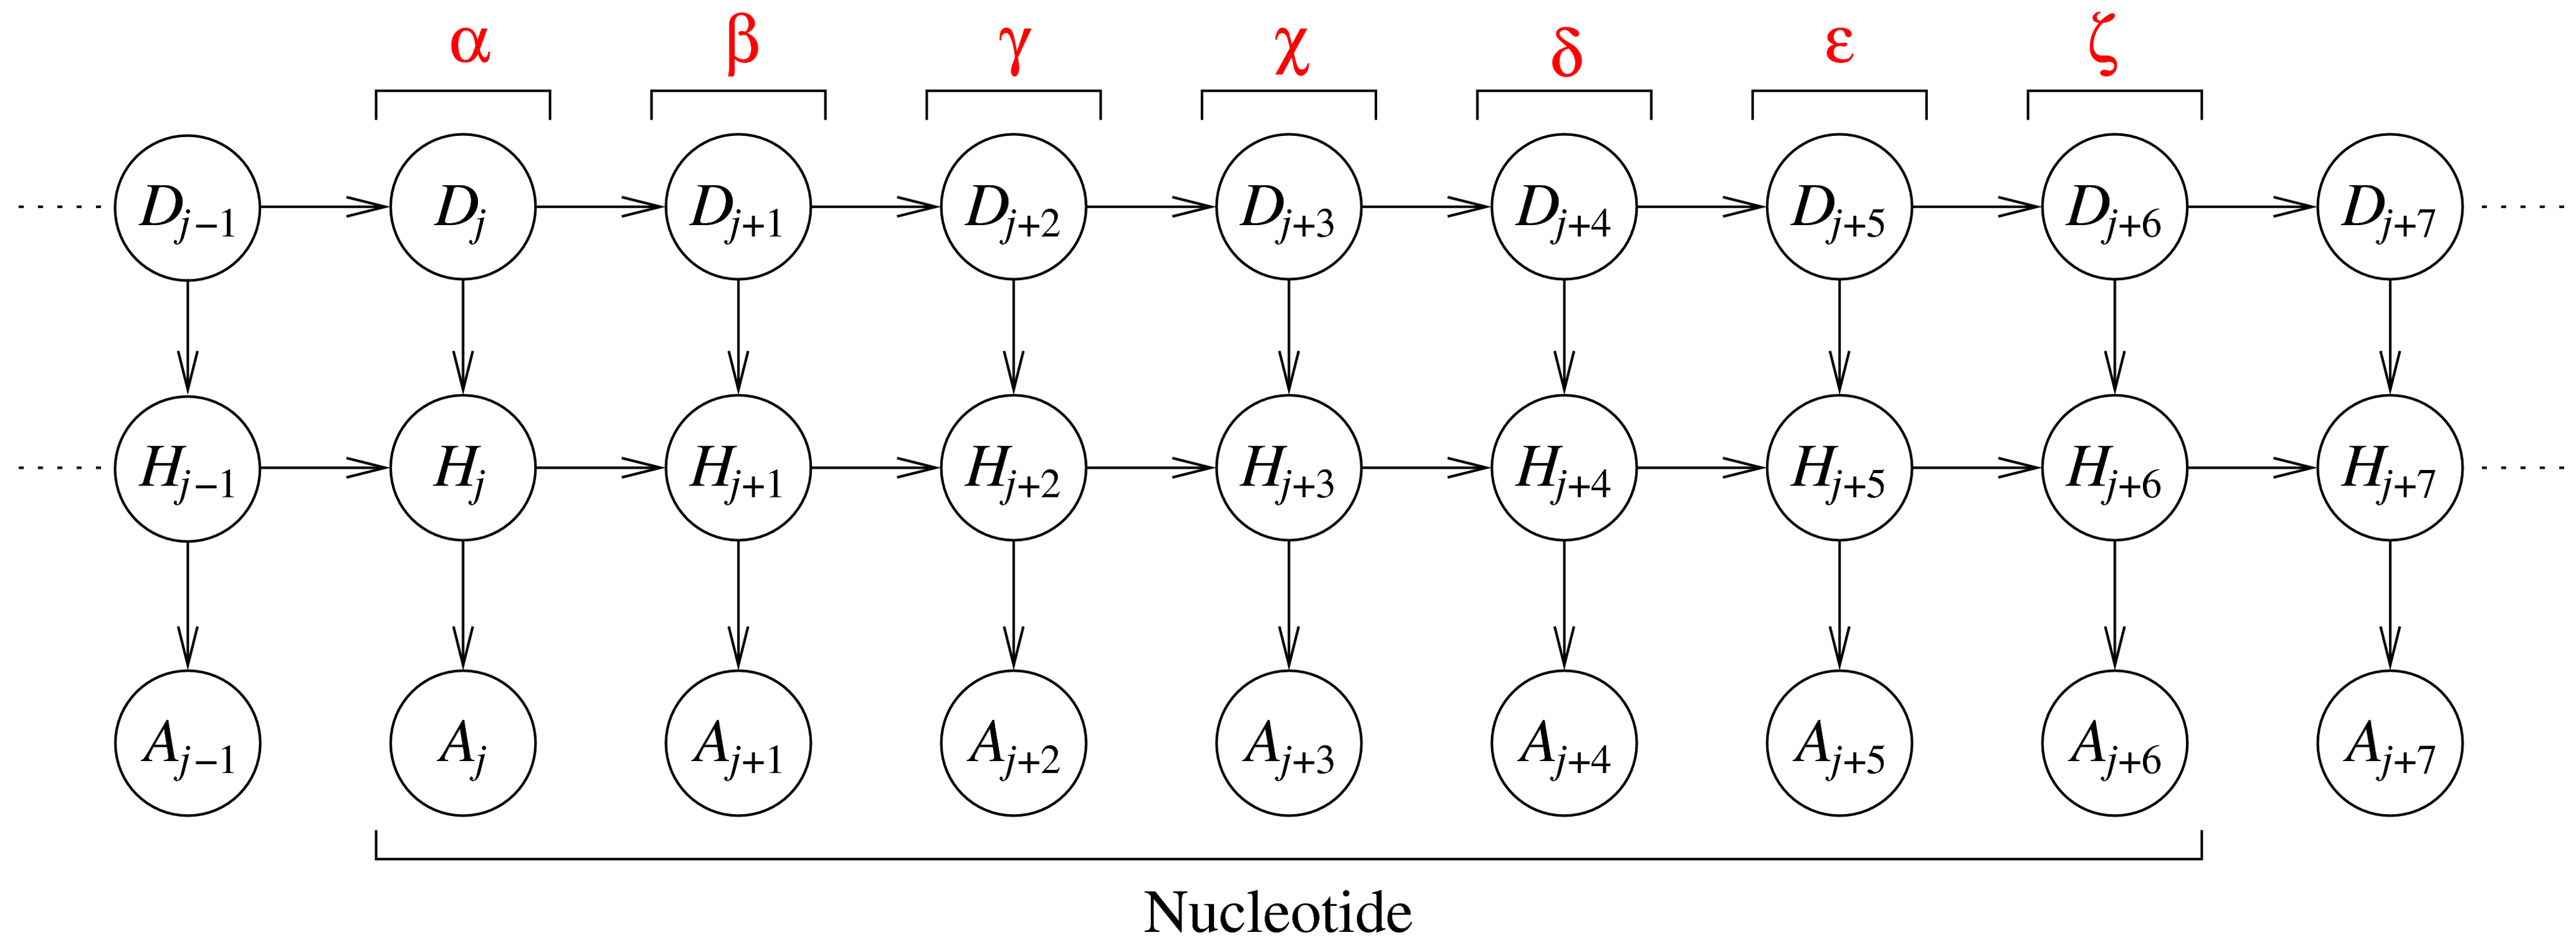 The DBN represents nine consecutive dihedral angles, where the seven
central angles originate from a single nucleotide. Each slice j (a
column of three variables) corresponds to one dihedral angle in an RNA
fragment. The variables in each slice are: an angle identifier, Dj, a
hidden variable, Hj, and an angular variable, Aj. The angle identifier
keeps track of which dihedral angle is represented by a slice, while the
angular node models the actual dihedral angle value. The hidden nodes
induce dependencies between all angles along the sequence (and not just
between angles in consecutive slices).
The original source code for Barnacle, which contains an embedded
version of Mocapy written in Python, can be found at
<http://sourceforge.net/projects/barnacle-rna>.
The modified version of Barnacle, changed to work with the Mocapy
bindings can be found at
<https://github.com/mchelem/biopython/tree/master/Bio/PDB/Barnacle>.
Here is an example of use:
``` python
model = Barnacle("ACCU")
model.sample()
print("log likelihood = ", model.get_log_likelihood())
model.save_structure("structure01.pdb")
```
#### TorusDBN
Wouter Boomsma, Kanti V. Mardia, Charles C. Taylor, Jesper
Ferkinghoff-Borg, Anders Krogh, and Thomas Hamelryck. A generative,
probabilistic model of local protein structure. Proc Natl Acad Sci U S
A. 2008 July 1; 105(26): 8932–8937.
<http://www.ncbi.nlm.nih.gov/pmc/articles/PMC2440424/>
TorusDBN aims at predicting the 3D structure of a biomolecule given its
amino-acid sequence. It is a continuous probabilistic model of the local
sequence–structure preferences of proteins in atomic detail. The
backbone of a protein can be represented by a sequence of dihedral angle
pairs, φ and ψ that are well known from the [Ramachandran
plot](http://en.wikipedia.org/wiki/Ramachandran_plot). Two angles, both
with values ranging from −180° to 180°, define a point on the torus.
Hence, the backbone structure of a protein can be fully parameterized as
a sequence of such points.
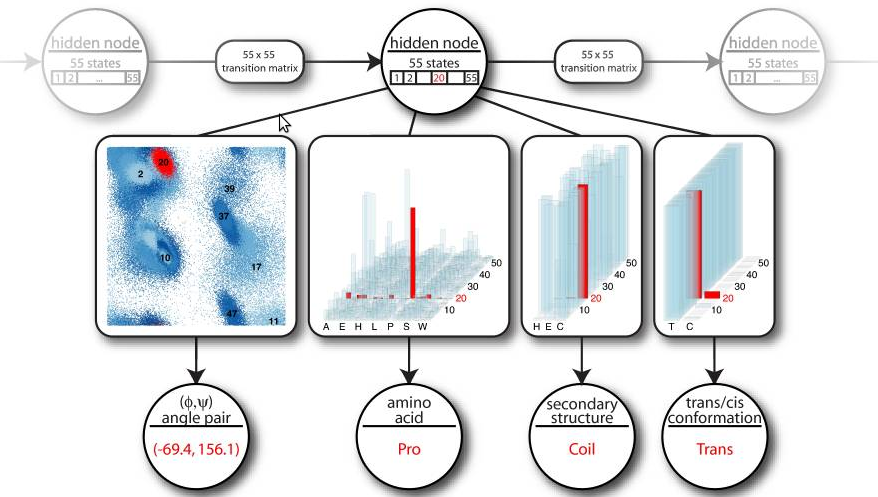 The circular nodes represent stochastic variables. The rectangular boxes
along the arrows illustrate the nature of the conditional probability
distribution between them. A hidden node emits angle pairs, amino acid
information, secondary structure labels and cis/trans information.
The TorusDBN model is originally implemented as part of the backboneDBN
package, which is freely available at
<http://sourceforge.net/projects/phaistos/>.
A new version of the TorusDBN model was implemented in the context of
this project and can be found at
<https://github.com/mchelem/biopython/tree/master/Bio/PDB/TorusDBN>.
The TorusDBNTrainer can be used to train a model with a given training
set:
``` python
trainer = TorusDBNTrainer()
trainer.train(training_set) # training_set is a list of files
model = trainer.get_model()
```
Then the model can be used to sample new sequences:
``` python
model.set_aa("ACDEFGHIK")
model.sample()
print(model.get_angles()) # The sampled angles.
```
When creating a model, it is possible to create a new DBN specifying the
size of the hidden node or loading the DBN from a file.
``` python
model = TorusDBNModel()
model.create_dbn(hidden_node_size=10)
model.save_dbn("test.dbn")
```
``` python
model = TorusDBNModel()
model.load_dbn("test.dbn")
model.set_aa("ACDEFGHIK")
model.sample()
print(model.get_angles()) # The sampled angles.
```
It is also possible to choose the best size for the hidden node using
the find\_optimal\_model method:
``` python
trainer = TorusDBNTrainer()
hidden_node_size, IC = trainer.find_optimal_model(training_set)
model = trainer.get_model()
```
IC is either the [Bayesian Information
Criterion](http://en.wikipedia.org/wiki/Bayesian_information_criterion)
(BIC) or the [Akaike Information
Criterion](http://en.wikipedia.org/wiki/Akaike_information_criterion)
(AIC) (Defaults to BIC. AIC can be specified by setting the use\_aic
flag).
For more details on the model API, see the test files:
<https://github.com/mchelem/biopython/blob/master/Tests/test_TorusDBNTrainer.py>
and
<https://github.com/mchelem/biopython/blob/master/Tests/test_TorusDBNModel.py>.
### Performance
A few performance measurements were made comparing test cases
implemented both in C++ and in Python. The tests were run in a computer
with the following specification: Core 2 Duo T7250 2.00GHz, Memory Dual
Channel 4.0GB (2x2048) 667 MHz DDR2 SDRAM, Hard Drive 200GB 7200RPM.
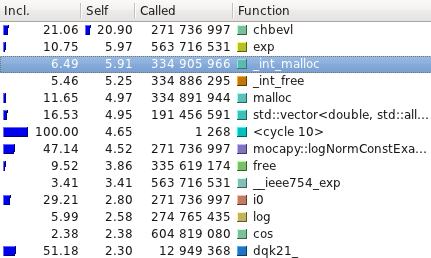
There were no significant performance differences. For both
implementations the methods responsible for consuming most cpu time were
the same:
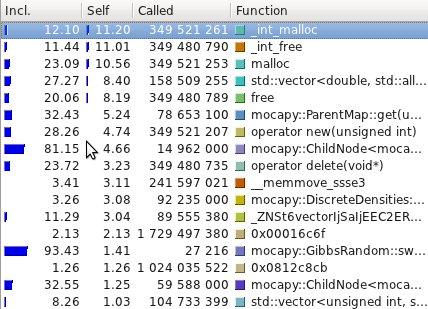
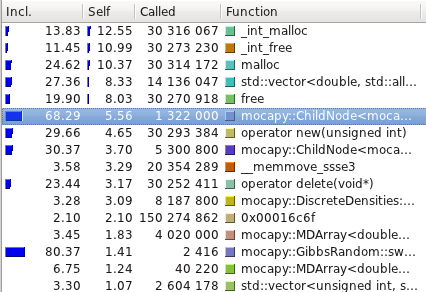 The profiling tests were made using
[Callgrind](http://valgrind.org/info/tools.html#callgrind) and
visualized using [Kcachegrind](http://kcachegrind.sourceforge.net/).
Here are the average running time of the examples available with Mocapy
(10 runs):
| Test name | C++ (s) | Python (s) |
|----------------------------|---------|------------|
| hmm\_simple | 0.52 | 0.58 |
| hmm\_discrete | 48.12 | 43.45 |
| discrete\_hmm\_with\_prior | 55.95 | 50.09 |
| hmm\_dirichlet | 340.72 | 353.98 |
| hmm\_factorial | 0.01 | 0.12 |
| hmm\_gauss\_1d | 53.97 | 63.39 |
| hmm\_gauss | 16.02 | 16.96 |
| hmm\_multinomial | 134.64 | 125.83 |
| hmm\_poisson | 11.00 | 10.60 |
| hmm\_vonmises | 7.22 | 7.36 |
| hmm\_torus | 53.79 | 53.65 |
| hmm\_kent | 61.35 | 61.06 |
| hmm\_bippo | 40.66 | 41.81 |
| infenginehmm | 0.01 | 0.12 |
| infenginemm | 0.01 | 0.15 |
#### TorusDBN
Even though the PDB files are read, parsed and transformed in a format
mocapy can understand, the most time consuming methods are the ones
performing mathematical operations during the sampling process
(Chebyshev and exp, for example).
 The model has been trained with a training set consisting of about 950
chains with maximum 20% homology, resolution below 1.6 Å and R-factor
below 25%. It took about 67 minutes to read and train the whole dataset.
The resulting DBN is available at
<https://github.com/mchelem/biopython/blob/master/Tests/TorusDBN/pisces_dataset.dbn>
and can be loaded directly into the model as explained in the TorusDBN
section above.
### Future work
The summer is over, but the work continues... There are still a lot of
things I intend to work on:
- Test the trained models to check their effectiveness in protein
structure prediction.
- Try to reduce dynamic allocation as it is responsible for a lot of
running time.
- Guarantee there are no memory leaks in the bindings.